Taking screenshots is becoming a habit of a new generation. Whether you want a Screenshot on Lenovo Laptop or a screenshot on a mobile, the new generation is used to taking screenshots of every important stuff over the internet.
Heck yeah! i also take screenshots of literarly anything that captures my attention and probalily seems funny in some way.
In this guide i will teach you on How to Screenshot on Lenovo Laptop.
How to Screenshot on Lenovo Laptop
Do you want to take a screenshot on your Lenovo laptop but don’t know how? Don’t worry, we will show you how!
Taking screenshots is a great way to capture information or save important images. In this guide, we will walk you through the process of taking screenshots on your Lenovo laptop.
We will also provide some tips for taking better screenshots. Let’s get started on How to Screenshot on Lenovo Laptop!
Methode 1: Using PrtScr Button

The Print Screen button on your keyboard can take a screenshot and save it as a file, take a screenshot without saving it as a file, or take a screenshot of only one window (instead of the whole screen).
The print screen button might be labelled as “PrtScn”, “PrntScrn”, “Print Scr”, or something similar. On most keyboards, the button is usually found between F12 and Scroll Lock or insert button.
To take a quick screenshot of the active window, use the keyboard shortcut Alt + PrtScn. This will snap your currently active window and copy the screenshot to the clipboard.
You’ll need to open an image editor (like Microsoft Paint), paste the screenshot in the editor and save the file from there.
To take a screenshot of the whole screen and save it as a file, press the Windows key + PrtScn. This will snap your entire screen and automatically save it as a PNG file in the “Screenshots” folder in your Pictures library.
The file name will look something like “Screenshot (NUMBER).png.”
To take a screenshot of only one window and save it as a file, press Alt + PrtScn. This will snap your currently active window and open the “Screenshots” folder.
The screenshot will be saved as a PNG file with the name of the window in the filename.
Methode two: Using Snipping Tool

Windows also has an inherent tool called “Snipping Tool” which enables you to take screenshots in many different ways including Free-Form Snip, Rectangular Snip, Window Snip, and Full-Screen Snip.
You can launch the snipping tool by searching for it in the start menu.
Once you open the snipping tool, you’ll see an area that is dimmed out and a menu at the top of the screen. The menu has four different snipping options that you can choose from.
The Free-Form Snip lets you draw any shape around the area that you want to screenshot. To use this tool, click on the “Free-Form Snip” button and then draw the shape around the area with your mouse.
Once you have drawn the shape, release the mouse button and the screenshot will be taken.
The Rectangular Snip lets you take a screenshot of any rectangular area. To use this tool, click on the “Rectangular Snip” button and then click and drag your mouse around the area that you want to screenshot.
Once you have selected the area, release the mouse button and the screenshot will be taken.
The Window Snip lets you take a screenshot of any open window. To use this tool, click on the “Window Snip” button and then click on the window that you want to screenshot.
The screenshot will be taken of the selected window.
The Full-Screen Snip lets you take a screenshot of your entire screen. To use this tool, click on the “Full-Screen Snip” button and the screenshot will be taken immediately.
Once you have snipped your screenshot, it will appear in a new window where you can annotate, save, or share your screenshot.
When you’re done editing your screenshot, click “File > Save As” to save it to your computer.
Methode three: Using Snagit (for Windows and Mac)

If you want more control over your screenshots and don’t mind spending a few dollars, Snagit is the best tool for the job.
Snagit is a paid app that gives you a ton of options for taking screenshots, editing them, and sharing them.
You can download a free trial of Snagit from their website to see if it’s a good fit for you.
Once you have Snagit installed, launch the app and you’ll see a menu with different capture options.
For this guide, we’ll be using the “All-in-One Capture” option.
Click on the “All-in-One Capture” button and you’ll see a menu with different capture options.
The “Image” option lets you take a screenshot of your entire screen, a specific window, or a selected area.
The “Video” option lets you record your screen or a specific window.
For this guide, we’ll be using the “Image” option. Click on the “Image” button and you’ll see a menu with different capture options.
From here follow the procedure on the screen or click here for a guide on how to use it.
Tips for taking better screenshots

No matter which method you use to take screenshots, there are a few tips that you can follow to make sure that your screenshots are as good as they can be.
First, try to avoid capturing anything with sensitive information like passwords or credit card numbers.
If you need to capture something with sensitive information, make sure to blur it out or black it out before sharing your screenshot.
Second, make sure that your screenshots are clear and easy to understand.
If you’re taking a screenshot of an error message, make sure to capture the entire message.
If you’re taking a screenshot of a website, make sure to capture the entire website and not just a small section of it.
Third, make sure that your screenshot is in focus. This means that you should avoid taking screenshots of things that are moving or changing quickly.
If you need to take a screenshot of something that is moving, try to pause it first or take multiple screenshots and stitch them together.
Fourth, try to avoid using low-resolution images. Screenshots that are taken at a low resolution will look pixelated and fuzzy when they’re viewed on a high-resolution screen.
To avoid this, make sure to take your screenshots at the highest resolution possible.
Fifth, make sure to take screenshots in good lighting. This will help to make sure that your screenshot is clear and easy to see.
If you need to take a screenshot at night or in a dark room, try to use a lamp or other light source to brighten up the area.
Finally, don’t be afraid to edit your screenshot. If you need to crop out part of the screenshot or add annotations, there are a number of tools that you can use to do this.
Conclusion
Once you remember the shortcut keys & combinations to taking a screenshot. It becomes very easy task on Lenovo laptop for you to take Screenshot.
There are also some applications which allows you to take the screenshot on your Lenovo laptop with the additional features of editing.
If you want to communicate your screenshots with effectiveness. You should know the short keys with combinations in order to get best result in a very short time.
Although Lenovo gives the best built in functions but you can also use the applications to enjoy the additional editing features which makes your work more easier & more simpler.
We hope after the brief discussion , methods & steps about taking the screenshot , you will be able to understand easily take screenshot on your Lenovo laptop.
Once you master the method for taking a screenshot you can take the screenshot within seconds and use them where ever you want easily.
Faq’s

-
What are the keys used for taking screenshots on Lenovo’s laptop?
Normally the key which is used for taking the screenshot on the Lenovo laptop is the function key along with the print screen key at a time.
-
How to screenshot on Lenovo Chromebook?
It’s very simple and easy to take screenshot on Lenovo Chromebook, you just have to hold down the Control Key and Shift Keys together and then press the Print Screen Key.
-
How to Screenshot on Lenovo Windows 7 Ultimate?
Press the Print Screen key on your available on your keyboard this will result in saving that screenshot to your clipboard which you can furtherly use in any document or you can use that screenshot in your Email too by just pressing the Control and V key simultaneously.
-
How can I screenshot on a Lenovo Windows 10?
For taking the screenshot on Lenovo Windows 10, you have to hold down the Windows key and Print Screen key at the same time.
This screenshot will be available on your clipboard. You can now easily use this screenshot in your Email or any kind of document.
-
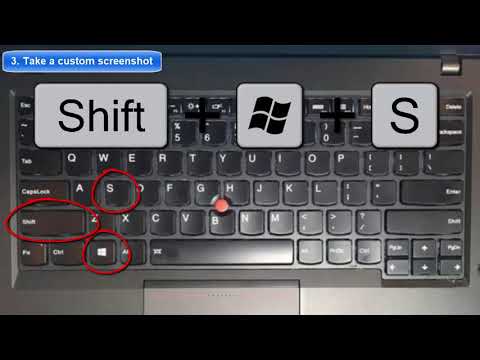
Does the snipping tool have any key?
Yes, snipping too have a key; Press Windows logo key + Shift + S to take a screenshot.
This will open the Snipping Tool. If you see an invitation and close it, you can open the Snipping tool by searching for it.
-
Where do the screenshots save on Lenovo Laptop?
The screenshots taken to to the default folder of screenshots located in pictures “C:\Users\Public\Pictures\Screenshots”. You can also able to change the folder location.
-
How do I take a screenshot if Print Screen isn’t working?
If your Print Screen key stops working, there are a few things that might be going on.
You could have a virus that is blocking the key or there could be a problem with your drivers.
You can try updating your drivers or running a virus scan to see if that fixes the problem.
if that dosent work consider doing a screenshot using the other methodes
Featured for reading: